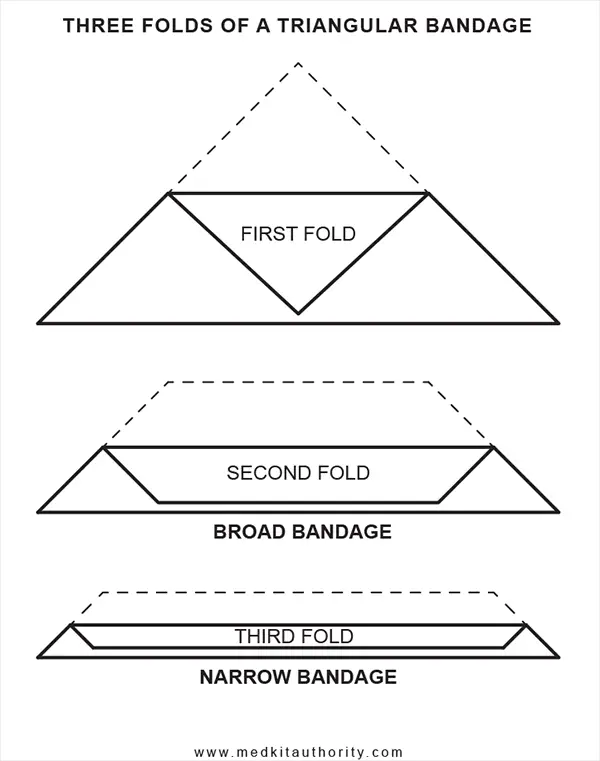
We often see triangular bandages used as arm slings, but they are very useful when folded and used as a bandage to cover wounds. This article will cover some basics of bandaging wounds, and then explain how to use a triangular bandage to do so.
Want to full breakdown of triangular bandages? Check out this article!
Basic principles of bandaging
The main purposes of bandaging a wound are to control bleeding and to protect against infection or contaminants. The other benefits are that it keeps the wound moist, warm, and medications can be applied to the dressing. How to bandage a wound:
- Protection – Wash your hands if you can, or put on gloves.
- Cut or remove clothing near the wound.
- Clean the wound – Rinse the wound with water or a saline solution, then pat dry. Use tweezers or hemostats to remove any debris. Rinse with an antiseptic solution if one is available.
- Prepare the dressing – Apply antibiotic ointment or petroleum jelly to the dressing.
- Apply the dressing – When using an adhesive bandage (like a Bandaid), the dressing is part of the bandage and is easy to apply. If you have a separate dressing (like gauze), you will need to use something like medical tape or the methods described in this article. Use pressure if the wound is still bleeding. The dressing should fully cover the wound.
- Monitor the wound – You may need to change the bandage several times if it becomes saturated with blood and to make sure that the wound remains clean. If the wound is bleeding heavily, it’s better to apply another dressing over the first until the bleeding stops.
Note: If the person is bleeding to a point that loss of life is possible, stopping the bleeding should be the first priority.
Bandages vs Dressings
What is a dressing?
A dressing is a sterile pad, cloth, or sponge used in direct contact with a wound. It is usually held in place by a bandage, tape, or wrap. A dressing protects the wound against contamination, absorbs blood, keeps a wound moist, and can be coated with a medication to promote healing and protect against infection. Gauze is probably the first thing people think of when they think of a dressing for first aid.
What is a bandage?
A bandage is a material used to hold a dressing in place or to create a splint or sling. It usually is not sterile, so shouldn’t come in direct contact with a wound. A bandage can be used to apply pressure to the wound to help stop the bleeding.
Adhesive bandages (AKA a Band-Aid) or an Israeli bandage are two examples of a bandage with an integrated dressing. Both come packaged in a way to keep it sterile and are not meant to be re-used.
To learn more about how a wound heals, check out this slideshow.
Methods of using a triangular bandage as a bandage
1. Dressing bandage for the leg or arm
This bandage is used to hold a dressing in place on the arm or leg.
- Place the center of cravat over the dressing.
- Begin ascending turns with upper end, and descending turns with lower end, with each turn covering two-thirds of preceding turn until dressing is covered.
- Terminate by tying both ends in square knot.
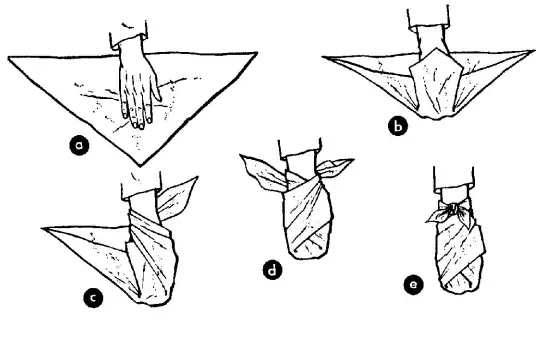
2. Hand / stump bandage
This bandage is used to hold a larger dressing in place on the hand.
- Place the middle of the base of triangle well up on the surface of wrist.
- Carry the apex over the hand and around ends of fingers. Cover the back of hand to wrist, and tuck the excess bandage into the small pleats on each side of hand.
- Cross each half of the bandage toward opposite side of wrist.
- Bring the ends of triangle around wrist.
- Tie the ends in square knot.
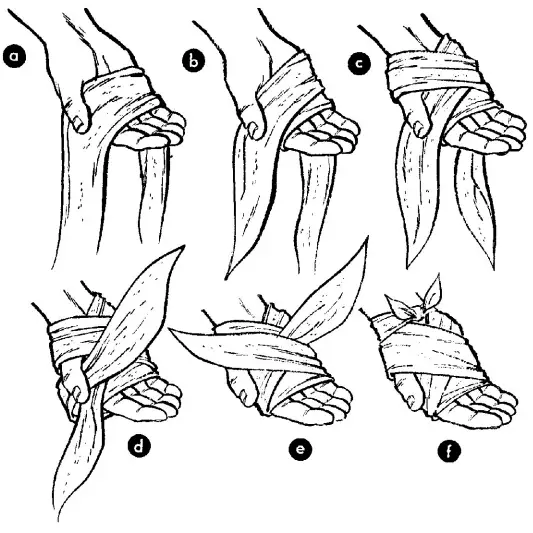
3. Bandage for the palm of the hand
This bandage can be used to hold a dressing in place in the palm of the hand.
- Lay center of cravat over center of palm of hand with ends hanging down each side.
- Bring the thumb end across back of hand, over palm, and through hollow between thumb and palm.
- Bring the other end across back of hand, toward base of thumb, and obliquely across palm to base of little finger.
- Cross both ends at back of hand.
- Continue procedure, ends crossing first at back of hand and then over palm.
- Tie in square knot at wrist.
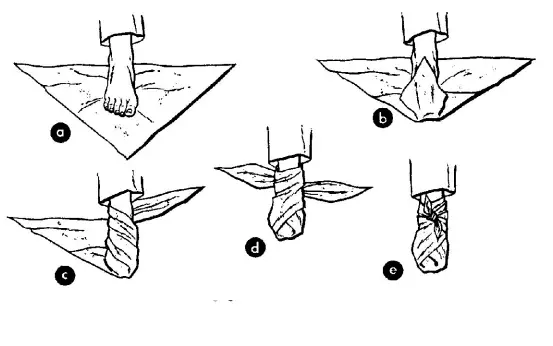
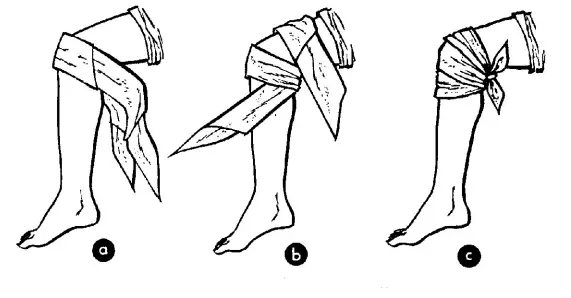
4. Foot bandage
This bandage is to generally protect the foot, or hold a larger bandage in place. It doesn’t necessarily apply much pressure to any single spot.
- Center the foot upon bandage at a right angle to base, with heel well forward of base.
- Carry the apex of triangle over toes to ankle, and tuck excess fullness of bandage into small pleats on each side of the foot.
- Cross each half of the bandage toward opposite side of ankle.
- Bring the ends of triangle around ankle.
- Tie the ends in square knot.
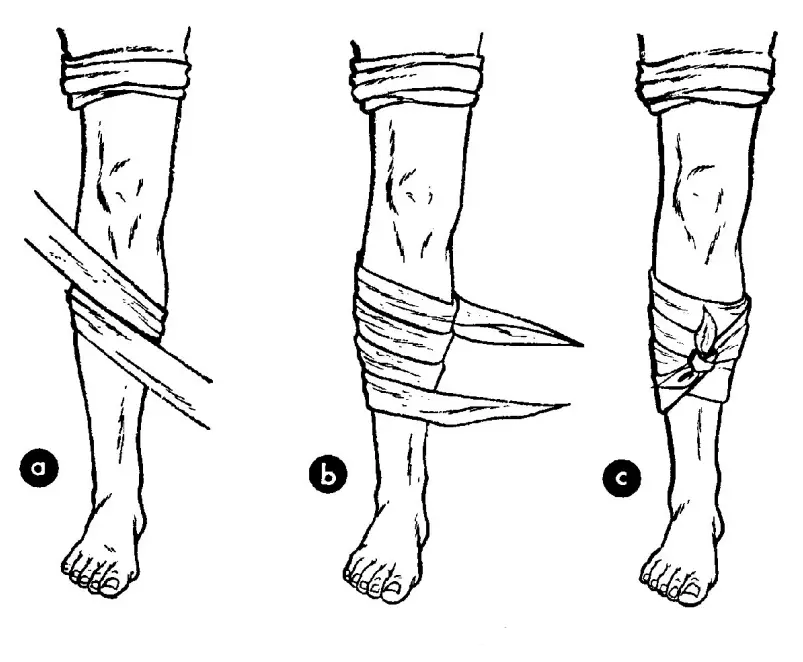
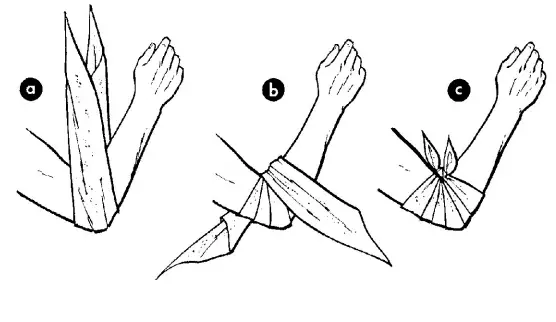
5. Elbow bandage
Hold a dressing in place on the elbow with this method.
- Bend the arm at elbow and place the center of cravat at the point of elbow
- Bring the ends up and across each other in overlapping spiral turns. Continue one end up the arm and the other end down forearm.
- Bring the ends to front of elbow (elbow pit) and tie.
6. Knee bandage
- Place the center of cravat over the kneecap and let the ends hang down each side of the knee.
- Cross the ends underneath and continue several overlapping descending turns down calf, and several overlapping ascending turns up thigh.
- Bring ends together and tie them together under knee.
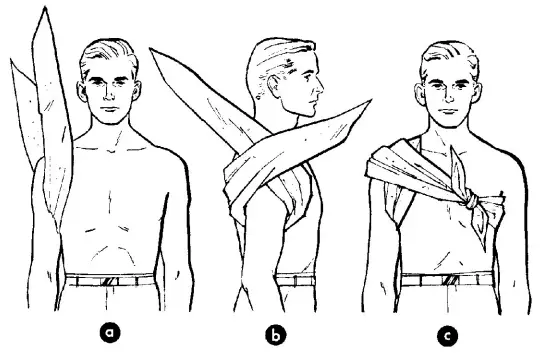
7. Shoulder or Armpit bandage
This technique will hold a dressing in place either on the shoulder or in the armpit.
- Place the cravat over the dressing in the armpit so the front end is longer than the back. Carry the ends upward.
- Bring ends across each other over top of shoulder.
- Cross ends over back and chest respectively to opposite armpit. Tie ends just in front of uninjured armpit.
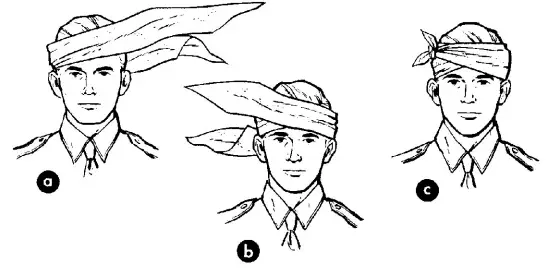
8. Head or ear bandage
Hold a dressing in place with this method, or use it to help control bleeding.
- Place middle of cravat over dressing.
- Pass each end completely around head.
- Tie in square knot.
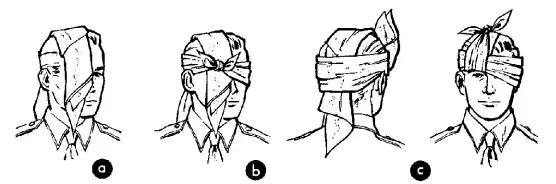
9. Eye bandage
This method requires two triangular bandages to hold a dressing or pad over the eye.
- Lay center of first cravat over top of head with the front end falling over uninjured eye.
- Bring second cravat around head, over eyes, and over loose ends of first cravat. Tie in front.
- Bring ends of first cravat back over top of head, tying there and pulling second cravat up and away from uninjured eye.
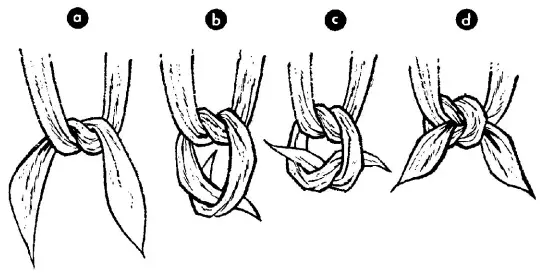
How to tie a square knot
Square knots are the suggested knot to use when tying a bandage. As with any bandage, it should be tied snuggly, but ensure that it doesn’t cut off the circulation.
The diagrams in this article were taken from US Army manual FM 8-50. That manual is no longer in service, but the principles haven’t changed. I’ve also modified the text for clarity based on my experience.
Have you used a triangular bandage before? Are there any ways you can use them as a bandage that I missed? Let us know in the comments below.