Triangle bandages are one of my favorite first aid items to keep in a medkit. It’s one of the cheapest and most versatile items you will add and can even be DIYed at home. This article will explain what a triangle bandage is, how to make one, and how to use them.
- What is a triangle bandage?
- What are triangular bandages used for?
- How big is a triangular bandage?
- What are the parts of a triangle bandage?
- The three folds of a triangle bandage
- How to fold a triangle bandage for storage
- How strong is a triangular bandage?
- Where to get a triangle bandage?
- How to make (DIY) a triangular bandage?
- How to make an arm sling (2 methods)
What is a triangle bandage?
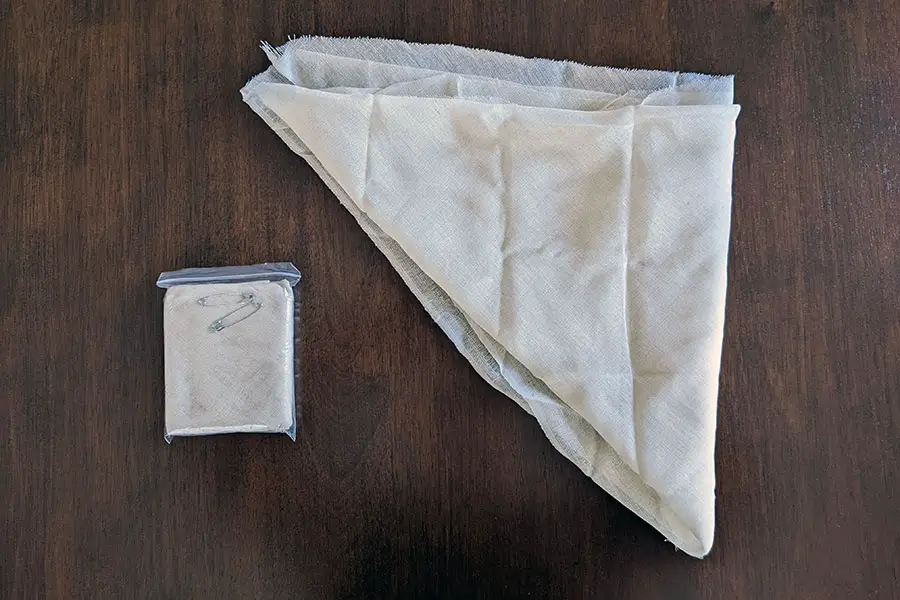
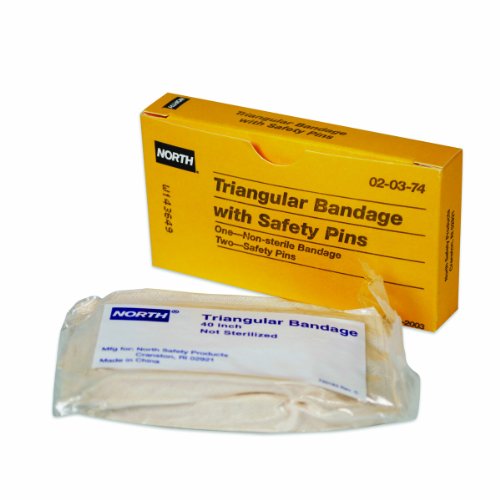
The triangular bandage is a triangular piece of cloth that has two equal sides (an isosceles triangle). Store-bought ones are typically made of muslin cloth or cotton but any thin cloth should work fine. Muslin cloth is made with very thin cotton yarn and is loosely woven. This makes it lightweight, breathable, soft and has a little flexibility. A thinner cloth is better so that it’s more easily folded up and stored, but it does have to be strong enough to perform as needed. They also often include a couple of safety pins to help keep the bandage in place when in use.
Although they are designed to be quite durable, the store-bought bandages don’t hold up well to being washed. The edges are not sewn and are susceptible to fraying.
What is a cravat bandage?
The term “cravat” is often used interchangeably with triangle bandage, often meaning the same thing. This term was formerly commonly used in the US Military, but not so much today.
What are triangular bandages used for?
Triangle bandages have four primary uses in first aid:
- Sling. This is probably the most common way that we see a triangle bandage being used. It can quickly be wrapped around and arm and tied behind the neck to immobilize the limb.
- Bandaging of wounds. When folded correctly, a triangle bandage can be used to bandage a wound. It’s large enough to wrap around a person’s head or thigh easily and even around some people’s abdomen. They can be used as the entire bandage or to hold a dressing in place to maintain compression.
- Immobilization. They can be used similar to an elastic bandage to wrap a joint and provide support. They can also be used to help create a make-shift splints.
- Improvisation. Part of a triangular bandage’s usefulness comes from its wide variety of uses. You might use it to improvise a tourniquet, a trauma pad, for protection against the sun, a towel, or anything else you can come up with.
How big is a triangular bandage?
The most common size for a triangle bandage is 40″ x 40″ x 56″ (100cm x 100cm x 142 cm). Sizes can vary slightly by a few inches but are generally the same size. In its packaging, the bandage can fold down to pocket size; somewhere around 3.5″ x 4″.
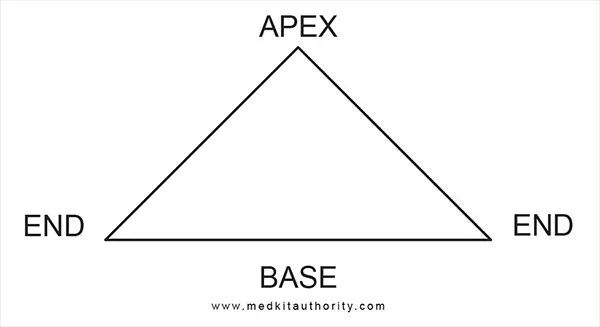
What are the parts of a triangle bandage?
To make it easier to explain how to use a triangle bandage, it’s good to identify the parts of the bandage. The three parts of a triangle bandage are the base, the apex (or point), and the ends.
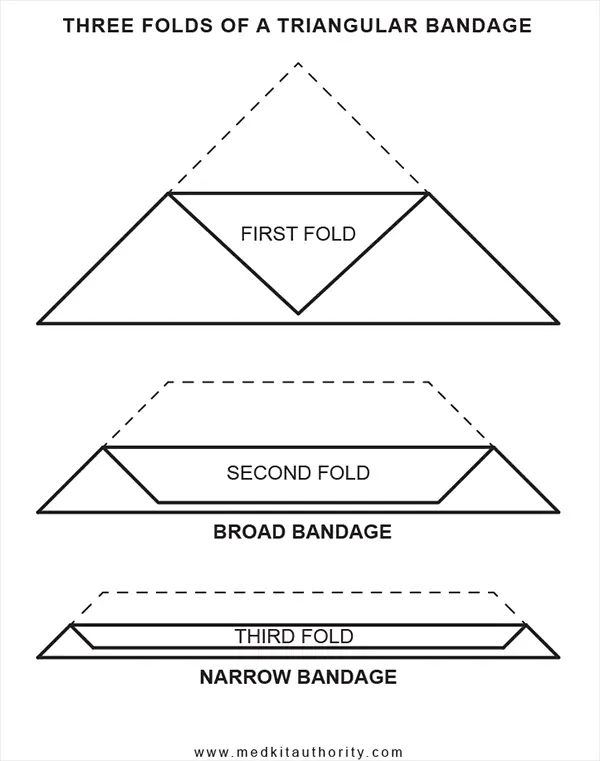
The three folds of a triangle bandage
Another useful way to describe how to use a triangle bandage is to understand the common ways it can be folded.
The first fold is simply folding the apex down to the center of the base.
A broad fold, or broad fold bandage, is made by folding the point down to the center of the base, then folding the new edge down to the base. One additional fold to the first fold.
A narrow fold, or narrow fold bandage, is a broad fold that has been folded once more towards the base. Two additional folds to the first fold.
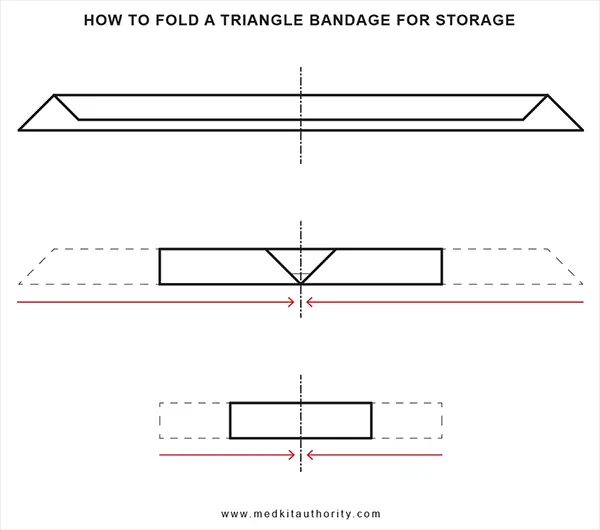
How to fold a triangle bandage for storage
To make the bandage easy to store, follow these steps.
- First, fold the bandage into a narrow fold bandage.
- Take either end of the bandage and fold them towards the middle.
- Again, fold the two ends towards the middle. Do this until it is sized to suit your storage needs.
- Make sure to store in a dry sterile container while not in use.
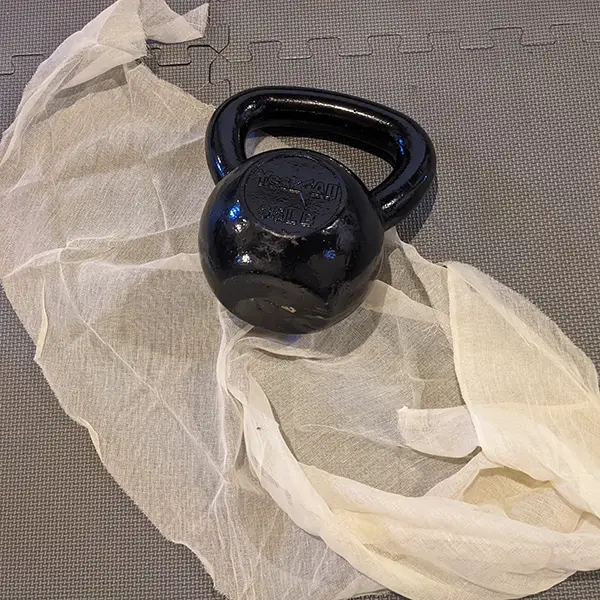
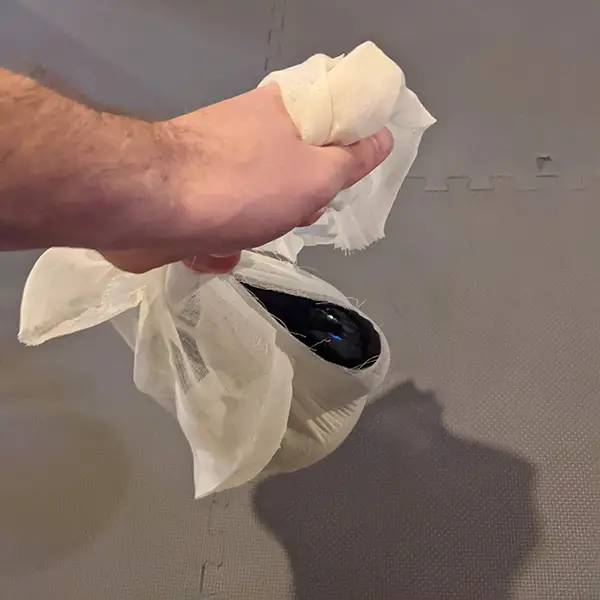
How strong is a triangular bandage?
I didn’t want to push it to the max, but I was curious. I was able to lift a 35-pound kettlebell in it without any signs of tearing. Given the size of a trangular bandage, I don’t think you would ever put anything in it that’s heavier than that.
Where to get a triangle bandage?
You’re likely able to find a triangle bandage at any of your typical corner drug stores as well as your common big box stores. They are also available from your favorite online retailer. They can range in price from less than a dollar for one to over $25 for special types or when button bulk. Below are three options you can buy on Amazon.


How to make (DIY) a triangular bandage?
It’s easy to find packages of multiple bandages so that you can buy cheaply in bulk, but you may want to create your own, especially if you have an old bed sheet lying around.
- Get some fabric. A cotton sheet or maybe a table cloth is your best bet. Clothing will be too small. This table will show you how many bandages you can make from each size bed sheet. Sheet sizes vary based on the sheet manufacturer, so these are approximate. We recommend the 40″ size cravat.
| Bed Type | Flat Sheet Size | No. of Bandages |
| Twin | 70″ x 100″ +/- | 4 at 40″ x 40″ x 56″ |
| Full | 84″ x 100″ +/- | 8 at 40″ x 40″ x 56″ |
| Queen | 92″ x 108″ +/- | 8 at 40″ x 40″ x 56″ |
| King | 110″ x 114″ +/- | 8 at 40″ x 40″ x 56″ OR 18 at 36″ x 36″ x 51″ |
- Cut it down. Next, you’ll want to cut the fabric down into squares not less than 1 yard (1 meter) in size, but we suggest 40 inches square. Tip: Cut off the seams. They will end up being pressure points and will make the bandage more difficult to store.
- Cut into triangles. Cut each square in half from two opposite corners. You should end up with two identical triangles that each have two sides the same length.
- Sterilize. If you intent to use these for bandaging or dressing, be sure to sterilize them. You can place them in a pot of boiling water for several minutes or you can soak them in a sanitizing agent.
- Dry. Sterilize the inside of your dryer and dry on the highest setting. They should come out without wrinkles, so no need to iron. If you don’t have a clothes dryer, iron on a clean surface and on the highest temperature for that cloth type.
- Store. Fold and store in a sterile bag. Zip top bags work or vacuum sealing is great too.
How to make an arm sling (2 methods)
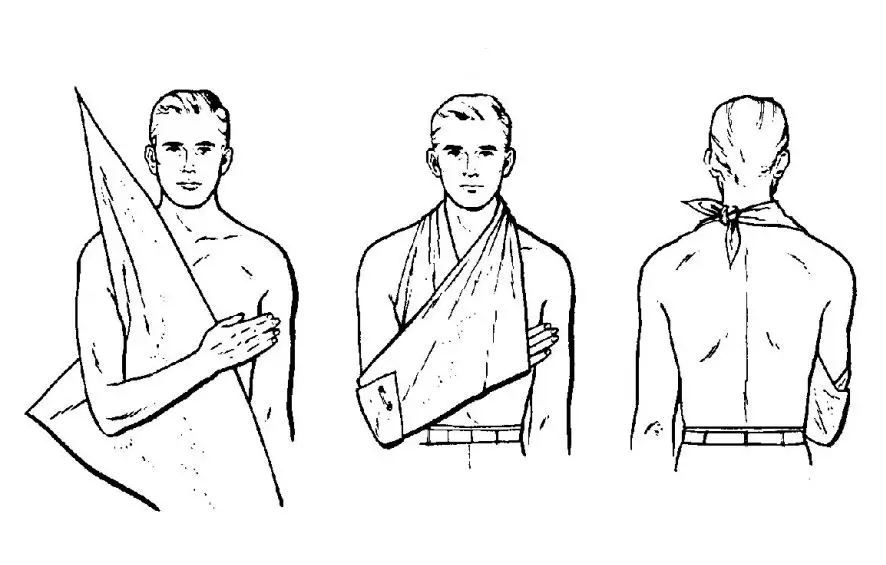
Arm slings are used to support injuries and fractures to the forearm, hand, or wrist. The arm sling is how you’ve most likely seen a triangular bandage being used. Here are two methods to create an arm sling. The first is your more common method that supports the arm with both shoulders. The second supports the arm without applying pressure to the collar bone or shoulder of the injured arm.
Method 1
- Bend the arm at elbow so that little finger is about a hand breadth above level of elbow.
- Place one end of triangle over shoulder on injured side and let bandage hang down over chest with base toward hand and apex toward elbow at the level of the elbow.
- Slip bandage between body and arm.
- Carry lower end up over shoulder on uninjured side.
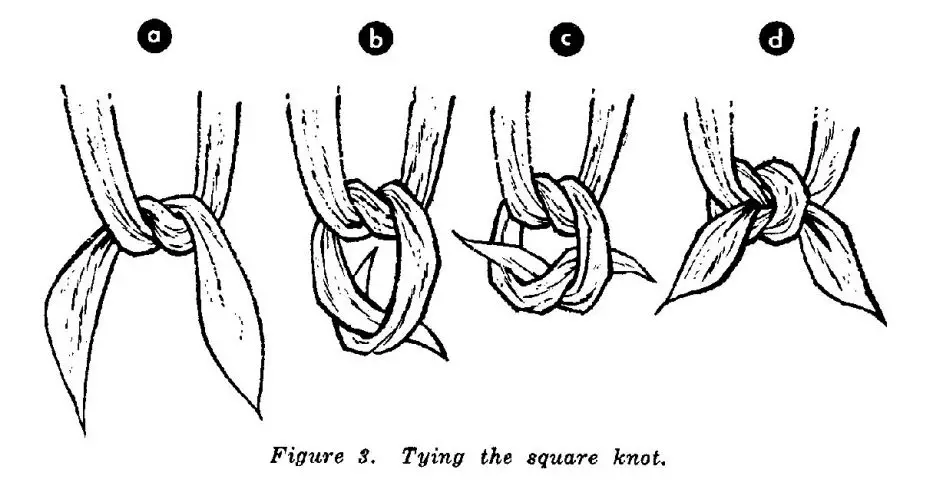
- Tie the two ends, by square knot, at the neck. Knot should be on either side of neck, not in the middle where it could cause discomfort when patient is lying on back.
- Draw apex of bandage toward elbow until snug, bring it around to front, and fasten with safety pin or adhesive tape.
Method 2
- Bend arm at elbow so that the little finger is about a hand-breath above level of elbow.
- Drape upper end of triangle over uninjured shoulder.
- Slip bandage between body and arm.
- Carry lower end up over flexed forearm (ends of fingers should extend slightly beyond base of triangle).
- Slide lower end of bandage under injured shoulder between arm and body and secure the two ends with a square knot.
- Draw apex toward elbow until snug, and secure with safety pin or adhesive tape.
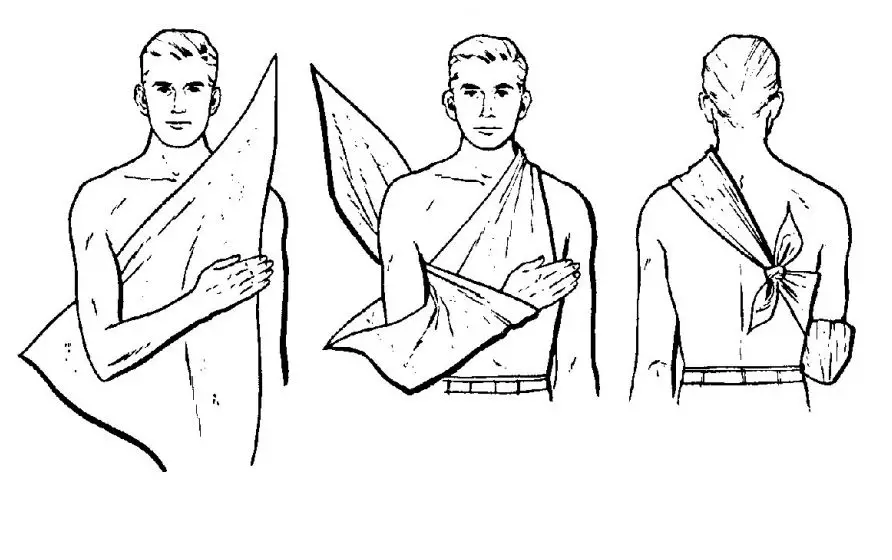
Tip: For either method, if you don’t have a safety pin, twist the apex so that it cups the elbow snugly, tie it off and tuck it in.
Warning! After the sling is applied, be sure to check it periodically for circulation in the fingers. You don’t want to cut off the blood flow and may need to loosen or adjust the sling.
These methods and images were taken from US Army manual FM 8-50. The manual is no longer in use, but the use of a triangular bandage hasn’t changed. I’ve also added some tips based on my experience.
How to tie a square knot.
You probably already know how to tie a square knot, but didn’t know what it was called. Below is a quick diagram.
How have you used a triangular bandage in the past? Let us know in the comments.