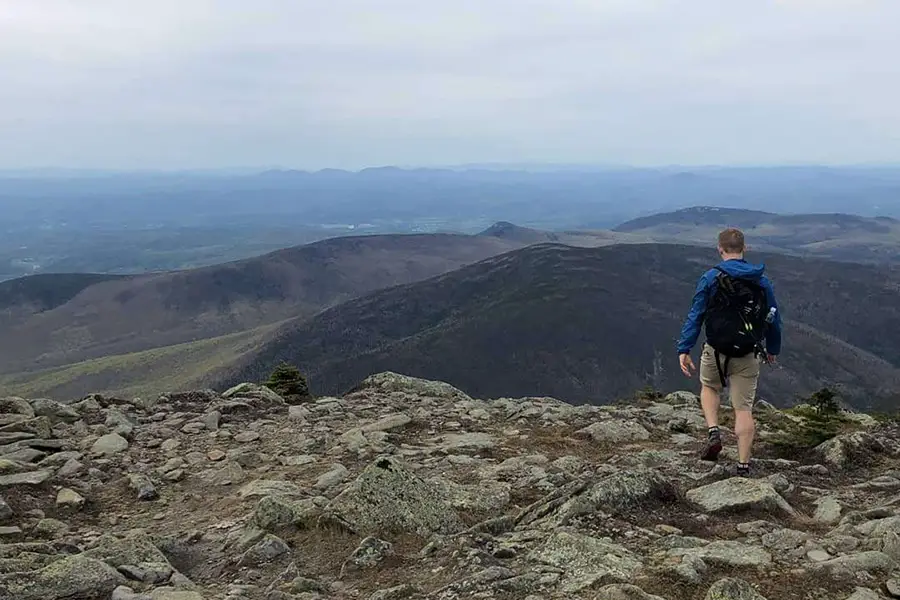
Imagine you’re out for a day hike, alone in nature on a beautiful day. As you’re taking in the sights you mistakenly take a wrong turn at a trail intersection and hike for several hours in the wrong direction. It’s getting dark, your phone doesn’t have reception, and you’re running out of water. You’re realizing you haven’t prepared fully for this trip thinking that survival gear isn’t needed for a day hike. What should you carry in this situation? What are some things you should do to prepare, even for shorter hikes? This article will explain what you need to know about assembling a hiking emergency kit and will establish some basic survival knowledge.
What are the four basic survival needs?
Understanding the basic needs that the human body requires to survive can help you determine what you will want to add to your survival kit. You can look back at this list to help you assess if an item is worth adding to your kit or not. The four basic survival needs consist of:
- Food – If hydrated, a person can usually survive for several weeks before dying of starvation. This means food is the least critical need when prioritizing the response.
- Fire – Fire serves many purposes: provides heat, boils water, dries clothes, signals for help, and it provides a psychological comfort when alone in the wilderness. Practicing the art of creating a fire with minimal tools can be lifesaving.
- Water – If you are hiking on a hot day, your body may already have a water deficit. Dehydration can lead to dizziness, confusion, feeling of tiredness, or cramps. A person can only survive without water a couple of days, probably less if they are physically active.
- Shelter – Shelter can be achieved with clothing, natural formations, or with a structure. It keeps us protected from the elements, protected from predators, and provides a phycological sense of safety.
There is the often referenced “rule of threes” to help you remember what will kill you in a survival situation: 3 minutes without air, 3 days with water, 3 weeks without food. Of course, every person is different, but this is an easy-to-remember guideline.
What are the 10 essentials to carry on any wilderness, hiking, or camping trip?
There are many variations of “the 10 essentials”, but they are all fairly consistent. They’re defined by reputable outdoors organizations such as the National Park Service, the AMC, and the Boy Scouts of America. It provides a checklist for the sort of items you should always carry in order to achieve the basic survival needs as well as get yourself to safety. Here is the National Park Service‘s list of the 10 Essentials:
- Navigation – Map, compass, and GPS system
- Sun Protection – Sunglasses, sunscreen, and hat
- Insulation/Clothing – Jacket, hat, gloves, rain shell, and thermal underwear
- Illumination – Flashlight, lanterns, and headlamp
- First Aid Supplies – First Aid Kit
- Fire – Matches, lighter and fire starters
- Repair Kit and Tools – Duct tape, knife, screwdriver, and scissors
- Nutrition – Food
- Hydration – Water and water treatment supplies
- Shelter – Tent, space blanket, tarp, and bivy.
What should a hiking emergency kit contain?
Now that we’ve established a basic understanding of what your hiking survival kit will need to achieve, let’s take a look at what we would want in our hiking emergency kit.
Navigation
Minimum: Paper Map and Compass
Backups/Upgrades: Phone GPS, Emergency Beacon, you might want a batter or travel solar panel to keep your phone charged
Sun Protection
Minimum: Bring enough clothes to keep you covered.
Backups/Upgrades: Sunscreen
Insulation/Clothing
Minimum: Bring layers to add or remove protection and insulation as needed.
Illumination
Minimum: I would suggest a minimum of 30 lumens to walk through the woods in the dark, 50 is better.
Backups/Upgrades: 100 lumens will allow you to see further down the trail and a wider area. 300 lumens can light up the night enough to run on the trail. Often headlamps and flashlights with more lumens have additional settings to save battery life.
First Aid Supplies
Minimum: Keeping a first aid is critical. See our articles on hiking and backpacking first aid kits. Make sure to bring extra prescriptions as well.
Fire
Minimum: At least keep a lighter or waterproof matches with you.
Backups/Upgrade: A ferro rod can get wet and will still get a fire started up to 100 times. Bring along a fire starter and tinder to help you get a fire started when the wood is wet or in inclement weather.
Repair Kit/Tools
Minimum: This is a pretty broad category, but duct tape and a multi-tool will cover most of the bases.
Backups/Upgrade: Full tang knives are much better and more durable for things like carving and splitting wood. For the size and weight, a wire saw is a great option for cutting wood for a shelter or fire. A few other items would include a sewing needle, zip ties, whistle, signal mirror, cordage, etc.
Nutrition
Minimum: Bringing more calories than you need is a good idea for any hike. Having something for an emergency that is high in sugar can give you the boost you need to go a little further. Something like a running gel works well.
Backups/Upgrades: If you’re near water, fish can be the best and easiest source of food, so consider carrying some basic fishing supplies. Foraging for edible plants is great if you have the skillset, but it’s something that you need to practice beforehand.
Hydration
Minimum: You should always carry more water than you’ll need on a hike. You should also carry some way to purify water in case of an emergency. Tablets are the smallest and easiest to carry, but a limited quantity means limited uses.
Backups/Upgrades: A metal bottle can be used to boil water in. A Lifestraw is great, but if less convenient when trying to carry water with you. A water filter is better and can filter thousands of gallons of water. You should also consider additional ways to carry water. Condoms are small, but a flexible bladder is better and still packable and lightweight.
Shelter
Minimum: Space blankets are usually the first item suggested due to their weight and size. For the same size, you can bring a rain poncho which is rain and windproof, often bigger, and easier to use in the wind. Both is even better and still light weight.
Backups/Upgrades: You should also consider a survival bivy and some sort of shelter. You can get larger ponchos that are not disposable and can be used as a tarp shelter as well.
How to DIY a mini survival kit
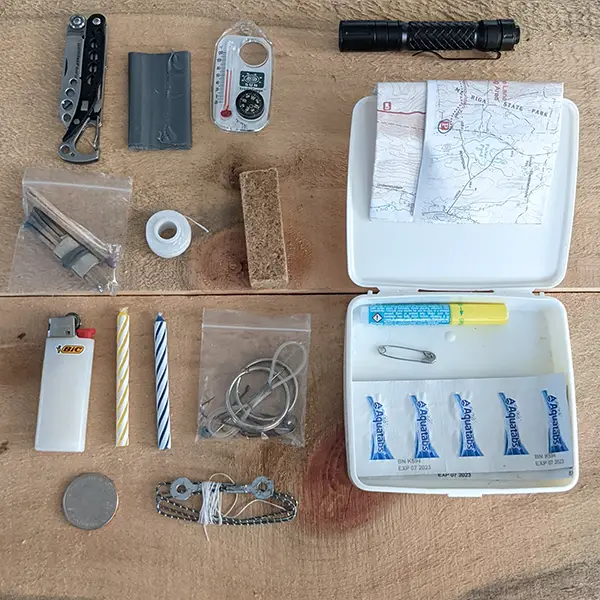
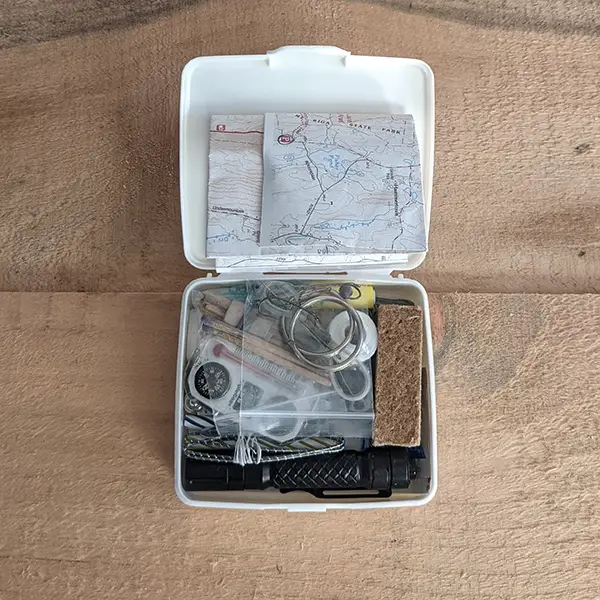
I find this to be a good balance of size and usability. The biggest complaint I have is that it’s not waterproof. I started with a Johnson and Johnson first aid kit that you can buy for a couple of dollars from most supermarkets or drug stores. They’re usually found in the travel section and can fit in your pocket. Then I added the following:
- Leatherman Micra Multi-tool. I’m not sure that the still sell the exact model I have, but I chose this one becauce it has scissors instead of pliers.
- Ducttape (about 3′)
- Compass Keychain. I’ve switched this out with a larger button compass that doesn’t take any more room.
- Mini Flashlight. This model boasts 180 lumens on full output, but also has a dim mode that’s plenty bright for tasks around camp. I also wanted one with a baseball hat clip. The Fenix E12 is much better if you can afford it, but I plan on keeping it tucked away most of the time.
- Waterproof matches and striking surface
- Roll of floss
- Firestarter. I’ve had good luck with these and I like that you can cut them to a size that fits your case.
- Lighter
- A couple birthday candles
- Small fishing kit with sinkers, line, and hooks
- Mini wire saw
- Map
- Mini liquid badage tube (superglue would work too)
- Water purification tablets. There are 10 tablets for 20 liters shown.
- Safety pin and sewing needle
How to DIY a hiking emergency kit
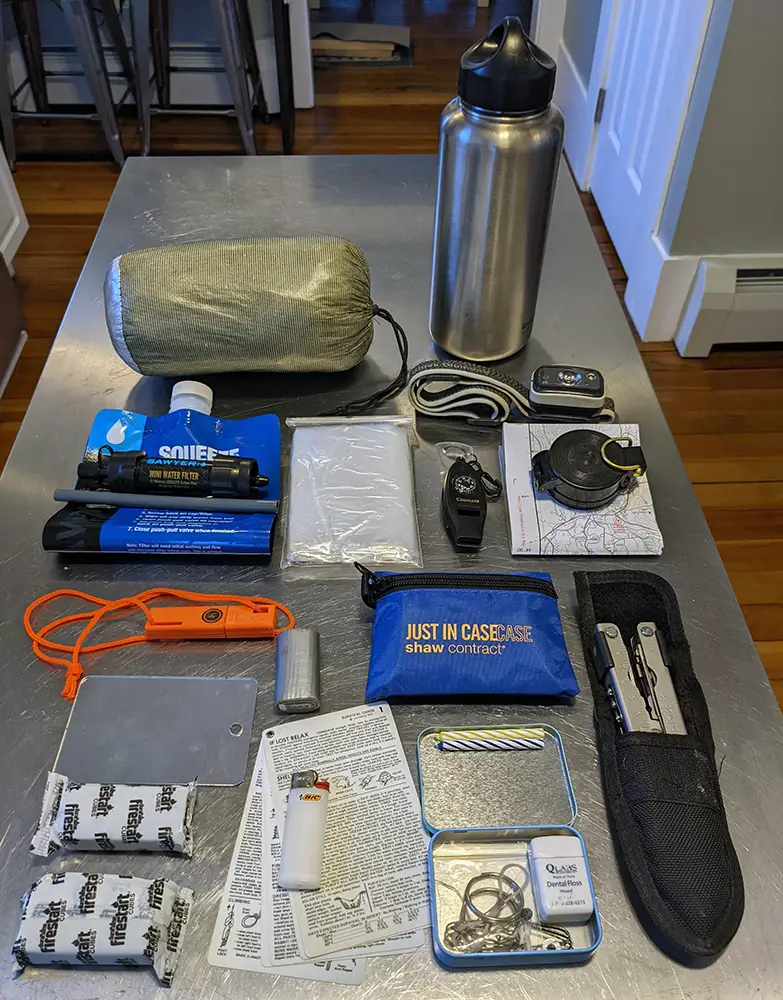

This is what I would consider a more comprehensive kit for longer hikes. The whole setup fits in a gallon ziplock bag pretty easily with the exception of the water bottle and multi-tool.
- Single wall aluminum water bottle. I like Klean Kanteen products. I’m showing the 40oz wide mouth bottle, but that size can be a little much. The 27 oz size is probably better.
- Emergency Bivvy. There are smaller ones out there, but I’ve used this with a sleeping bag liner in warmer months while backpacking. It has held up well and weighs a little over 8oz.
- Water filter. I like the Sawyer Mini because of it’s size, the fact that you can use it like a straw, and the added water carrying capacity you have with the 1/2 liter bladder.
- Headlamp. I use the Black Diamond Spot 350. I’ve ran trails at night with this, and it is plenty bright enough. You can also dim it to save batteries.
- Poncho
- Compass and map
- Ferro rod
- Duct tape roll (10′)
- First aid kit. I carry a DIY backpacking kit like this.
- Signal mirror
- Fire starters
- Survival cards. These are 20 years old and I haven’t been able to find them again, but some sort of survival pocket guide is recommended.
- Tin with miscellaneous items like fishing kit, sewing needles, safety pins, lighter, candles, floss, wire saw, etc. I like the Trader Joe’s mint tins because they are smaller than the Altoids tin.
- Multi-tool. I’ve been using the Gerber MP600 since I was in the Army. The abilty to open it with one hand really sets it apart.
My take on the Altoids tin survial kit
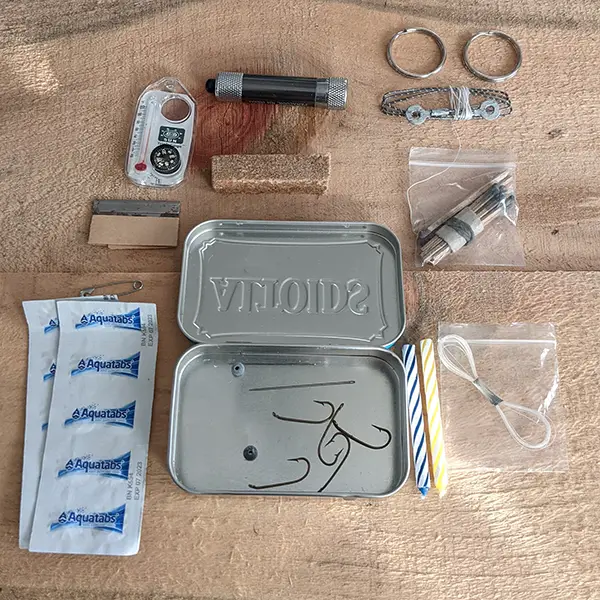
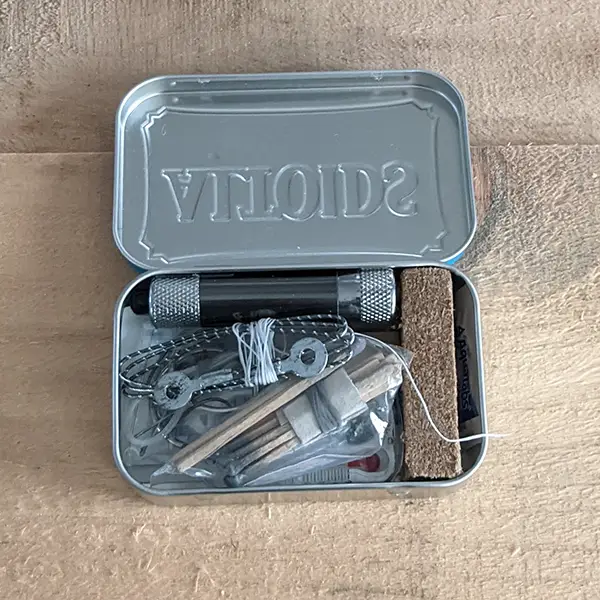
This is my take on the Altoids survival kit using the gear I already have. You’ll see that it’s essentially the same as my mini survival kit but with a few items swapped out, particularly the flashlight and the multi-tool. If you carry a multi-tool and flashlight in your pocket, you can probably put together a kit that would be much more useful, but it’s a fun exercise either way.
Set yourself up for success with these tips
- Give friends or family your itinerary so they know where to look if they don’t hear from you.
- Learn how to use a compass. Take a land navigation class to know how to use a map and compass and to read the terrain.
- There are lots of pocket survival guides. All the tools in the world won’t help you if you don’t know how to use them.
- Check the batteries for any of your devices before you leave and remove batteries when items are in storage. Bring a rechargable battery for your phone and for rechargable headlamps.
- If you’re not familiar with building a fire, practice beforehand. Challenge yourself to try lighting a fire in rainy or wet conditions.
- Keep your phone on airplane mode while you’re hiking. It saves the battery but will still allow you to use the phone’s GPS functions. It has the added benefit of not allowing any texts and calls to come through so you can enjoy your time in nature.
- If you like to GPS your hikes, consider a GPS watch so you can save your phone battery.
- Pre-hydrate! Start a day or two beforehand to ensure your body is fully hydrated, especially for hotter or more strenious hikes.
What do you keep in your day hiking survival kits? Let me know in the comments below!