Hiking is a great way to get out and into nature. Taking the time to prepare by researching the route, sharing your itinerary with others, and packing the appropriate equipment is essential to enjoying your time in the wilderness. Along with the appropriate amount of food, water, and emergency items, a first aid kit should be included. A hiking first aid kit can help with those small cuts and scrapes, as well as help you get back to the trailhead after a more serious injury. This article will explain what you should carry, what the items are used for, and give you some additional tips for preparing for your hiking adventure.
What should a hiking first aid kit contain?
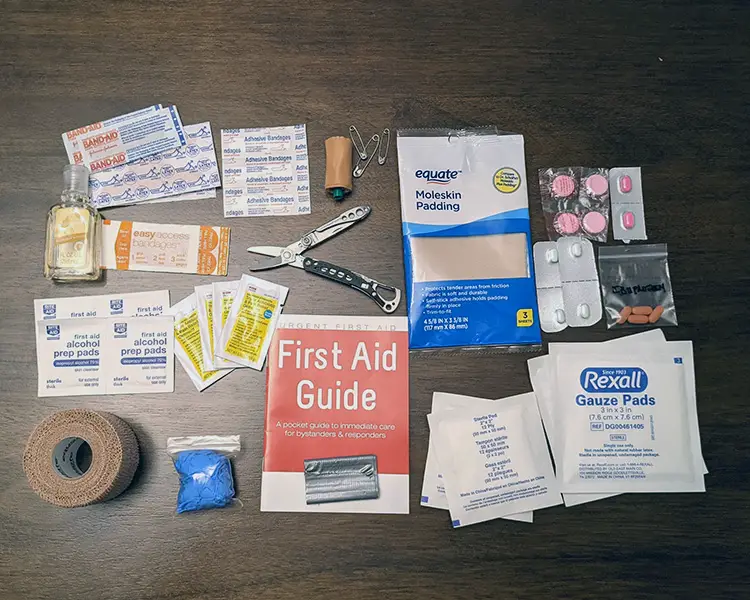
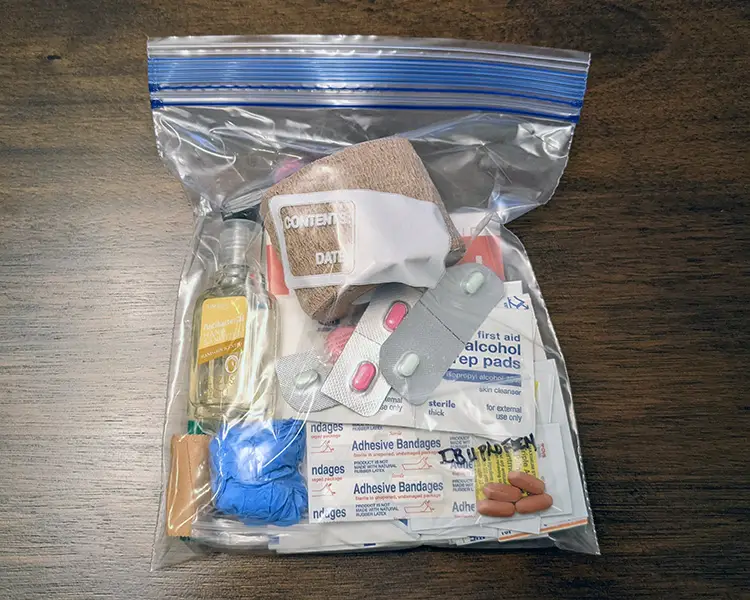
Here is a list of the typical contents of a day hiking first aid kit for 1-2 people.
- (4) Alcohol Pads
- (1) 1oz bottle of hand sanitizer
- (2) 1″x3″ Bandages
- (2) Fingertip Bandages
- (2) Knuckle Bandages
- (3) Butterfly Closures
- (1) 0.5 oz tube of antibiotic ointment
- (1) roll of Leukotape or similar blister tape
- (1) 4″x4″ Moleskin pad
- (3) safety pins
- (2) doses of Pepto Bismol
- (2) doses of Immodium
- (2) doses of Benadryl
- (2) dose a Ibuprofen
- (1) 2″ wide gauze roll (or several 2″x2″ gauze pads)
- (1) 2″ or 3″ roll of elastic bandage
- (1) tweezers
- (1) scissors
- (2) pairs of nitrile gloves
- First Aid Pocket Guide
- Waterproof Case
What are the contents of a hiking first aid kit and their uses?
- Alcohol prep pads or other antiseptic pads. You’ll need some way of cleaning and sanitizing wounds as well as your equipment. Single use individual pads are the way to go. I prefer alcohol pads but some may prefer other antiseptic pads (like iodine pads) to avoid the sting of alcohol on an open wound , especially if you have children.
- Hand sanitizer. Alcohol based is best so that it can be used to help start a fire if needed.
- Adhesive bandages. You’ll want an assortment of adhesive bandages. They might include your typical 1″x3″ Band-Aid as well as bandages for your knuckles and fingertips. You could also carry a few butterfly closures or Steristrips for larger, open wounds. These have a strong adhesive that will help pull an open wound together. Only use these if you are sure the wound is completely clean.
- Antibiotic ointment. This is good to apply to a wound or on the bandage itself to keep the wound clean and promote healing. It’s also helpful to apply to gauze to keep it from sticking to the wound. You can carry a small tube or several individual, single use, packets.
- Blister protection tape. Leukotape has been my go to since it sticks extremely well to the skin and doesn’t cause a lot of friction. Duct tape also works well but isn’t always easy to peel off your skin, especially if the blister is broken. This tape is also helpful to cover adhesive bandages to keep them from falling off or to keep gauze in place. Cut it lenthwise when using on bandages to make it last longer.
- Moleskin or blister protection bandages. These products tend to be thicker and cushion a blister. You’ll usually want to use blister protection tape to ensure that the padded blister bandage does not come off.
- Safety pins. These are helpful for popping blisters as well as holding makeshift slings together. They can also help repair ripped pieces of fabric on your clothing or backpack.
- Over the counter medications.
- Pepto Bismol – For nausea, diarrhea, indigestion, heartburn and acid reflux.
- Antihistamine – For relieving allergy symptoms. Even if you don’t think you have allergies, these are good to take along.
- Pain reliever / Anti-Inflammatory – Carrying both acetaminophen (Tylenol) and an NSAID (Ibuprofen) is a good idea. Be sure to know what side affects they may have and how they may interact with other drugs.
- Gauze. Carry a combination of pads and rolled gauze for larger wounds and more significant bleeding. 2″x2″ and 3″x3″ pads are good sizes to start with, or a 2″ wide or 3″ wide roll.
- Elastic Bandage. Rolling an ankle or falling and spraining your wrist are very common injuries while hiking. Bring an elastic bandage (like an ACE bandage), usually 2 inches or three inches wide, to wrap and support weak or injured joints and limbs.
- Scissors. These are useful for cutting tape, bandages, and moleskin as well as clothing or food packaging.
- Tweezers. Tweezers are helpful for removing ticks and splinters.
- Nitrile Gloves. Carry a pair to keep your hands from transferring dirt and bacteria to the wound, and to keep the bodily fluids of others off of you.
- First Aid Guide. Ideally, you will have taken some sort of wilderness or outdoor first aid class but having a first aid guide on hand is great for reminding you how to treat common injuries. You can DIY your own by rewriting or retyping from a comprehensive first aid guide, cutting it to size, and laminating it.
- Prescription Medication / EpiPen. You’ll want to carry 2-3 extra days worth of prescription medication in case you get lost.
- Waterproof Case. Something as simple as a ziplock bag is sufficient to keep your first aid kit in. You may want to keep the ziplock back in something that is more abrasive-resistant like a zippered nylon pouch.
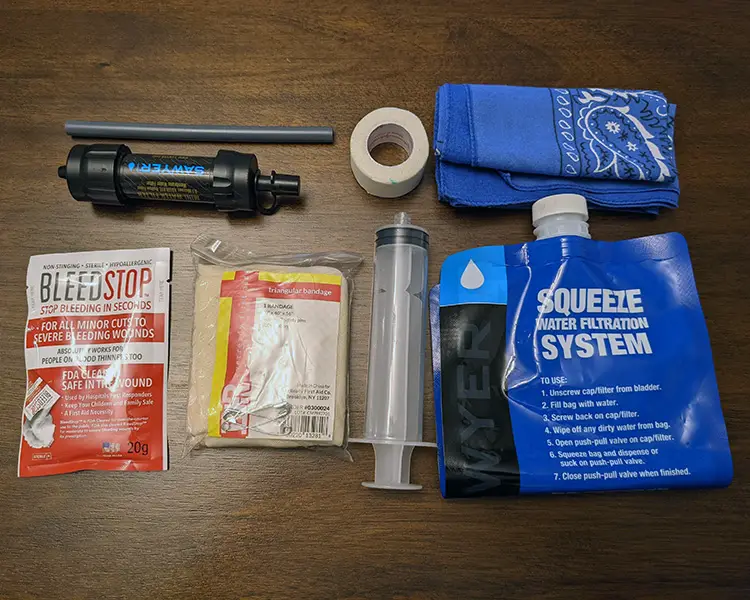
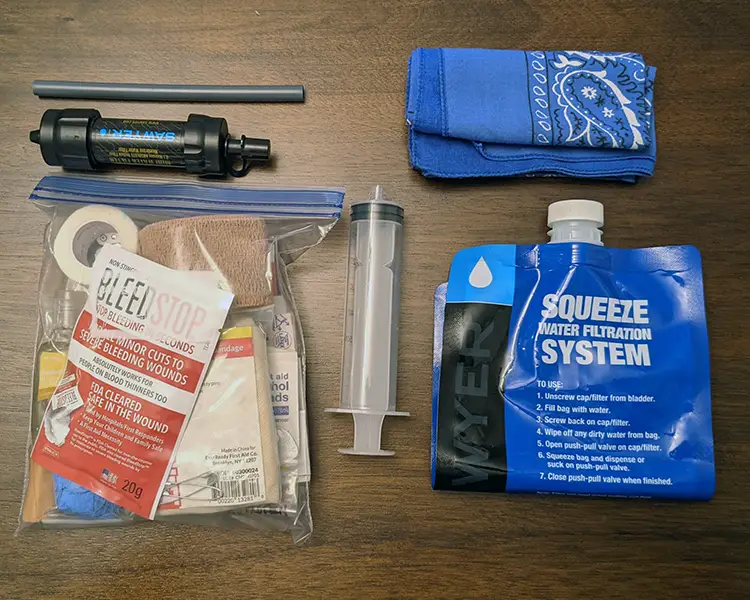
Upgrades/Add-ons to consider.
There is a never-ending list of items you can carry to be prepared for every situation, but not practical. These are additional items that might be worth adding to your first aid kit if you think they’re necessary.
- Hemostatic Gauze / Powder. Hemostatic agents help the body to quickly clot bleeding wounds. If you’re hiking in an area where there are hunters, or if you think you’re at a greater risk to having a more traumatic puncture wound, consider carrying hemostatic agents with you. The easiest way to upgrade a kit you already have is to buy individual packets of powder that you can use with the items already in your kit, but the hemostatic gauze is easier to use in a stressful event.
- Water Filter. Hydration is first aid and one of the most important resources if you were to ever get lost. Carrying a Lifestraw or iodine tablets work OK for emergency situations. Carrying a filter like the Sawyer Mini is only slightly larger and will allow you to refill your water containers along the way.
- Triangular Bandage. A triangular bandage is a large cloth bandage, typically around 40x40x56, that can be used as a sling, to help splint a broken limb, to wrap major wounds or around the head, or can be used as a tourniquet.
- Medical Tape. If you want to include this, I suggest a 1″ x 10′ roll. I consider this an upgrade because you can already use duct tape or Leukotape if you need to hold bandages or gauze in place. Having extra tape is never a bad idea, however.
- SAM Splints – SAM splints (structural aluminum malleable) are lightweight and versatile rolls made of aluminum and foam padding used to quickly immobilize and splint a limb. They are available in several sizes, but can also be cut with normal scissors. They have the added benefit of being reusable.
- Irrigation Syringe. Relatively small and light weight, these are great for rinsing dirt and debris out of a wound. A 12cc syringe is big enough and easy to carry.
- Bandana. A bandana can be used in similar ways to a triangle bandage. You can improvise a tourniquet, improvise a splint, or use is as a pressure bandage.
Consider carrying a survival kit as well. See our article on hiking emergency kits here.
Common hiking injuries and how to prevent them.
- Blisters. Wearing appropriately sized and fitted shoes, socks, and clothing are the first steps to preventing blisters. Bodyglide, foot powders, and treating hot spots as soon as they occur are the other important steps to take. Read this article for a comprehensive guide for dealing with blisters.
- Sunburn. If you are hiking exposed to the sun, sunburns are very possible. Apply sunblock before leaving and wear long sleeves or a hat to protect your skin.
- Insect bites. Apply insect repellent before you leave and carry it if you think it’s necessary. Sometimes the bug situation is much different on the trail than at the trail head. Cover exposed skin with long sleeves, pants, etc. to protect yourself as well. You can also apply Permethrin to clothing beforehand which impregnates your clothes with an insect repellent that lasts for several washes.
- Poison Ivy / Poison Oak. Unfortunately, you don’t know you have poison ivy or poison oak until it’s too late. Know what the plants look like and try to avoid them. You can also wash any exposed skin to try to remove the oils and minimize its effects.
- Dehydration. Drinking water days beforehand as well as during your hike is important to stay hydrated. Be sure to bring more water than you think you’ll need. You may also want to include electrolyte tablets or bring a drink powder to add to water that contains electrolytes to help prevent cramping.
- Heat injuries. This is a topic for an entire article. Just know that it’s a real possibility and take the time to learn more. Take a look at this article to get you started.
- Cold weather injuries. Another topic that deserves an entire article. See this site to learn more.
- Sprains and strains. These are damage to the tissues or muscles that connect or attach to the bones in your body. Rolling an ankle, falling and landing on your wrist, or stepping wrong and hurting your knee can all lead to a sprain or strain. The best way to minimize these injuries is being adequately in shape for the demands of the activity you’re engaging in and being properly stretched. If you have previous injuries, you may be able to support the joint with a brace or wrap. Consult your doctor.
The most important item to carry in your hiking first aid kit.
I’ve mentioned improvising treatments a few times in this article. Knowing how to treat an injury is more important than having the best tools to do so. Therefore, knowledge is the best tool you can have on hand when treating an injury. Take a wilderness first aid class, get yourself a first aid guide, and take the time to review it. Practice the techniques you learn, especially how to improvise things like a splint or a tourniquet.
How much does a hiking first aid kit typically weigh?
A hiking first aid kit can weigh anywhere from 3-4 ounces up to 1 pound. The lighter range (between 3-5 ounces) are minimal kits, usually without a pocket guide, and would depend a lot on improvising solutions to injuries. Heavier kits will usually have more durable cases, greater quantities of the typical contents, and perhaps some survival items like an emergency blanket. Kits heavier than 1 pound are usually geared towards groups of people, or for trauma injuries, which may be useful for something like a hunting trip.
Is it cheaper to buy a hiking first aid kit or make your own?
It’s most often cheaper to buy a premade hiking kit than it is to make your own unless you already have most of the contents on hand. In the long run however it will likely be cheaper to build your own as you will have to replenish your kit’s contents over time. This all depends on how often you go hiking and how often you use your first aid kit. An important thing to consider is the quality of the contents included in your kit. Premade kits often have cheap supplies and when you build your own, you can include quality content. I’d suggest buying the best quality content that you can afford since this is an investment into your health and well-being.
11 Reasons Why You Should DIY Your First Aid Kit
What do you carry in your hiking first aid kit? Is there something I missed, or something you want to know more about? Let me know in the comments below.