If you’re new to backpacking and are eager to get out there, it’s probably easiest to just go out and pick up a pre-made kit. These kits are a great place to start, but you’ll want to add items, and over time you’ll have to replace the contents as they are used. In the long term, it’s likely cheaper to create a kit from scratch so that it fits your needs, the needs of your trip, and is adjusted to the weight you prefer to carry. The following is a list of items I carry, their uses, and other useful items I like to add.
Ultralight First Aid Kit for Hiking
This is the kit I carry on any weekend backpacking trip. It’s ultralight, which means it’s stripped down and meant for one person. I usually hike with others who are experienced and will have a similar kit sized for themselves. For anything longer, or in areas that are extremely remote, I’ll add in items from the next section.
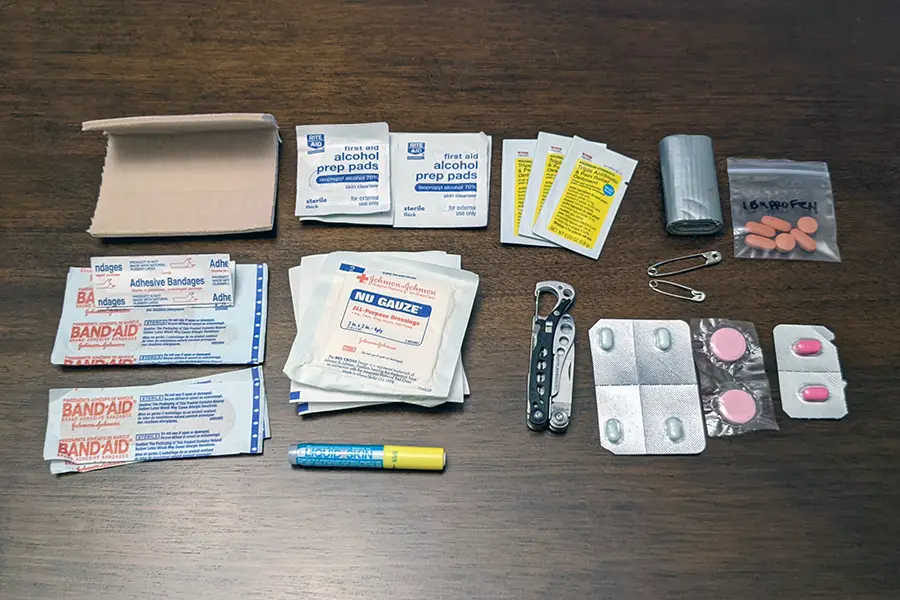
- Alcohol Prep Pads (3-5 packets) – For cleaning wounds and sanitizing equipment.
- Moleskin (one 4×4 pad) – I prefer a larger pad over the pre-cut pieces so that I can cut them to size myself.
- Blister Cushion Bandage (1-2 bandages) – These are bandages they are cushioned, usually waterproof, and designed specifically for blisters.
- Antibiotic Ointment (2-3 packets) – I prefer the individual packets to save weight.
- Duct Tape (+/- 6′) – You can create a mini roll of duct tape by rolling it onto itself or around trekking poles, water bottles, or a drinking straw.
- Safety Pins (2-4) – I carry these for popping blisters, but you can also use them for improvising a sling or holding together ripped clothing or backpacks.
- Adhesive Bandages (7) – I carry two finger bandages, two 1″x3″ bandages, two butterfly closures and a knuckle bandage.
- Pepto Bismol (2 tablets) – Treats diarrhea, nausea, upset stomach and heartburn. Check the interacting drugs because it’s not meant to be taken with ibuprofen, aspirin had some other common medications.
- Anti Diarrheal (2-4 doses) – I use Immodium and keep it around for when my only symptom is diarrhea or I can’t take Pepto.
- Ibuprofen (4-6 100mg pills) – I generally don’t like taking painkillers but this is good for taking the edge off after a long hike or reducing swelling in the case of a more serious injury.
- Antihistamine (2 doses) – Carrying in case of an allergic reaction and it helps with insect stings.
- Gauze (several 2″ pads or 2″‘ roll) – Gauze is good to have on hand for larger wounds or for heavier bleeding.
- Liquid Bandage – This is a great alternative to adhesive bandages. You won’t have to worry about getting it wet or having it fall off. Just make sure the wound is clean first. I normally wouldn’t bring this but I found a tiny container at the dollar store which is perfect.
- Mini Mutli Tool – I carry one that includes scissors, a blade, and tweezers.
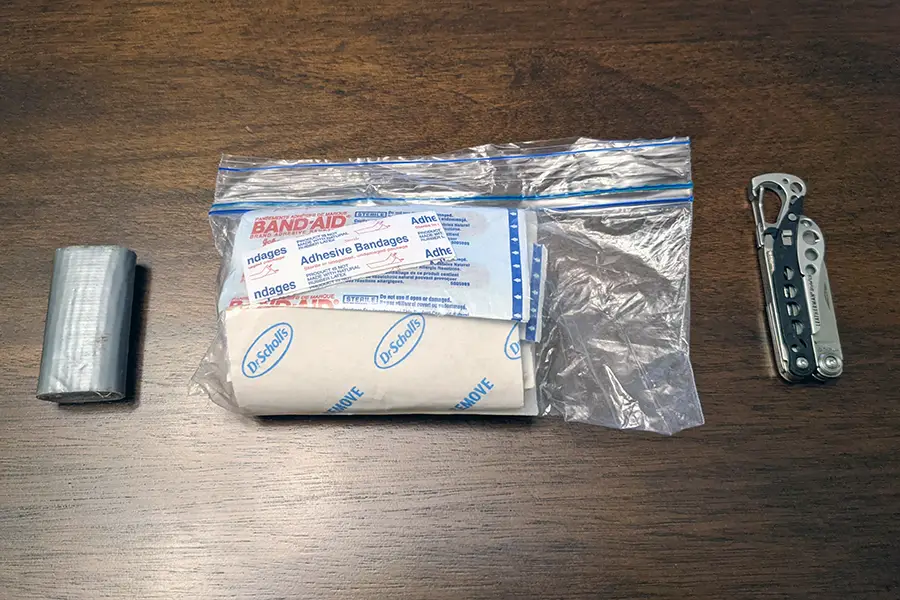
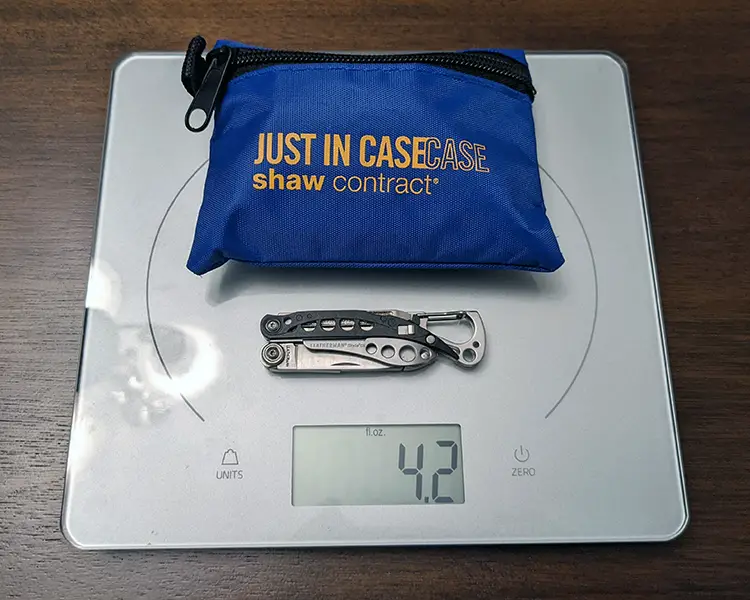
This kit fits in a snack-sized ziplock bag. I also prefer to keep it in a zippered fabric case which is about 3.5″x5″ for added protection.
Visit How To Create A Blister Kit for a full guide.
Additional add-ons or upgrades to my backpacking first aid kit.
I’ll start to add these items as my trips get longer, or if I’m hiking with less experienced friends and I want to make sure they are covered. Assess your personal needs or the needs of the group as you decide what items to add to your kit.
- Nitrile Gloves – In case you have to deal with a wound on another person or your hands are excessively dirty.
- Additional Gauze – I’ll add in a few extra gauze pads or another roll.
- Athletic Tape (1 roll) – I carry this in case of a rolled ankle or if I have to fashion a splint. I prefer the non reusable kind for backpacking because it’s sure to get dirty. It can also be used with gauze or clothing as a pressure bandage.
- Antibiotic Ointment (1 tube) – Something like Neosporin to use on cuts and burns. The tube is easier to use then the packets.
- Hemostatic Gauze / Powder (1 packet) – You should consider something for a serious bleeding event. A clotting agent when used with a pressure and a dressing can help to stop the bleeding.
- Additional Butterfly Closures – These are small and useful for closing up larger cuts.
- Additional Adhesive Bandages (2+ depending on number of people)
- Burn Gel (2-4 packets) – I don’t include this because an antibiotic ointment with pain relief will essentially do the same thing but without the cooling effect. Some people choose to carry it as there’s plenty of potential for burns when using a camp stove or working around a fire.
- Antiseptic Wipes (2-4) – These are also a little redundant, but they wont sting like alcohol pads will, so they might be good if your backpacking with children.
- Sting Relief Wipes (2 packets) – Bee stings can really hurt and these will relieve the pain and itching.
- Tweezers – You might want a pair above and beyond the one that comes with your swiss army knife to remove stingers, splinters, ticks, etc.
- Tick Remover – These are handy if you’re not comfortable with tweezers.
- Tylenol PM (1 dose per night) – If you’re in a full shelter, or if it’s a loud, windy, night, these can help you fall asleep as well as take the edge of sore legs.
- Blister Prevention Tape – Leukotape is a great option, sticks really well, and can be used to cover moleskin or other padded bandages. KT Tape stretches and conforms well to odd shapes. Duct tape works really well also if you want to minimize what you’re carrying.
- Gold Bond Powder / Baby Powder – If you’re prone to chafing or blisters, this can be applied before your hike. It’s also a great way to feel “freshened up” at the end of a hike before you get in your sleeping bag.
- First Aid Pocket Guide – How many times have you made a splint or had to wrap and ankle? You can get some great pocket guides that are small but worth their weight in gold.
- Prescription Meds – You want to bring at least two days extra worth of medications in case you become lost.
Hygiene kit/Survival Kit
These items are interwoven with the first aid kit and are considered part of my base pack.
- Spot Beacon or similar GPS SOS system – If something really goes wrong and you don’t have cell service, this is an invaluable piece of equipment. Some have the added benefit of allowing others to track you.
- Hand Sanitizer – Carry for obvious reasons, but also good as an emergency fire starter if it contains isopropyl alcohol.
- More Duct Tape – I always have at least two small rolls.
- Shoelace – I keep an extra shoelace on hand incase I have one that breaks. It can also be used for any scenario you might need a little string.
- Zip Ties (Two 8″) – When you don’t want something to come apart, these work great.
- Firestarter(s) – I try to keep them only for emergencies, but in winter or during rain it’s so much easier to get a fire started with these.
- Patch Kits – I carry patch kits for my inflatable sleeping pad and for my tent.
- Floss – Beyond getting food out of your teeth, you can use it to repair clothing or ripped fabrics or as a string. Also bring along a sewing needle or two.
- Travel Toothbrush / Toothpaste
- Earplugs – In case your tent-mate snores or for windy, rainy nights.
- Handwarmers – These are more for comfort than anything but are great for putting in the footbox of your sleeping bag on cold nights.
- Compass / Magnifying Glass Keychain – I usually don’t carry a full size compass but I do always carry one of these. These have the added benefit of a magnifying glass and some have whistles or other added tools.
- Poncho – I’ve spent a lot of money on rain gear over the years and not been thrilled with the results. My favorite is still a disposable poncho that you can buy for a couple of dollars. They’re small, lightweight and I can usually get several uses out of them before they tear.
- Iodine Pills / Bleach – Having a backup plan to get portable water is always a good idea. Iodine tablets are fairly common but take an hour to purify the water. Bleach can be used as well but this is obviously for emergency situation sonly and shouldn’t be used regularly. Make sure you carry the bleach in a container with a dropper so you can control the amount you put in your water.
- Toilet Paper – I carry a 1/2 to 3/4 finished roll, squish it down, and keep it in a zip lock bag.
- Survival Cards – These are small plastic cards with tiny font that have basic survival and first aid tips printed on both sides, but any pocket reference is useful.
- Phone Charger – I like to carry a small phone charger that will charge my phone at least 1-2 times. You can find some that have the ability to be used as a hand warmer. Also find one with a battery gauge so you can tell if it’s charged or not.
- Signal Mirror – This is designed for signalling rescuers in an emergency situation. I use it more to help put in contacts and to check those hard to reach places for ticks.
If you’re interested in learning more about comprehensive survival kits for hiking, visit our article What You Need For A Hiking Emergency Kit.
Tips for making a homemade backpacking first aid kit.
- Don’t be tactical. Many have a tendency to buy camo or black gear but if you’re backpacking or hiking you generally want to be seen, especially in an emergency situation. You might drop your lighter, knife, or fire starter and bright colors will help you find it faster. If your lost, bright colors can help you to be visible to rescue parties.
- If you’ve hiked in peak blackfly season you know how miserable it can be. A bug head net for when you’re at camp or not moving can make your trip much more enjoyable.
- I don’t usually carry an emergency blanket if I’m already packed for an overnight trip.
- Use small baggies or some other container to separate pills and label them. Make sure you know doses and potentially harmful interacting drugs as well.
- Make sure you bring more fuel for your stove then you’ll need.
- Improvise medical tape with duct tape, blister tape, shoelace, bandana etc. to use with larger wounds and with the gauze.
- If you use a Sawyer water filter you can use the flushing syringe to irrigate wounds. Make sure that the inside of the syringe is sanitary before doing so, however. Depending on the water bottle you carry, you can use it to irrigate wounds as well. Life water bottles with a nozzle are better than nothing. Poking a small hole in a plastic water bottle will work better. Ensure you have other means of carrying water before doing so!
- Getting a lot of debris in your shoes can make for a painful experience and lead to blisters. Using gators can help keep the debris out.
- Band-Aids are pointless on your feet. Don’t bother unless you plan to completely cover them Leukotape or something similar.
- You can use straws cut to around 2 inches in length to fill with liquids and gels to serve as single serving containers. Do not do this with antibiotic ointment however because the ointment does not work as well after being exposed.
- If you’re new to backpacking and being in the remote outdoors I highly suggest taking wilderness first aid, navigation, and survival skills classes.
11 Reasons Why You Should DIY Your First Aid Kit
How much does a backpacking first aid kit weigh?
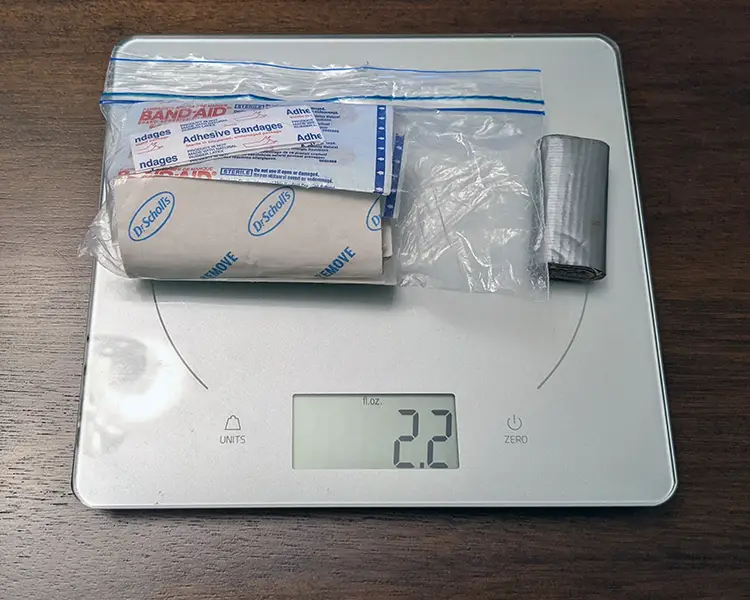
A homemade ultralight first aid kit usually weighs between 3oz – 5oz. Many of the store-bought kits for a single person for a couple of days weigh in around the same or slightly more. They won’t contain items like duct tape or a multi-tool but may contain things like more bandages or tweezers. Hiking and backpacking kits that are more comprehensive can weigh up to around 8oz. Ultimately, you should determine how prepared you want to be and build your kit off of that, rather than based on weight.
What kind of first aid items do you carry while you’re backpacking? Do you prefer a premade one? Leave a comment below.