Some of us are on our bikes almost every day. We may ride a bike to work or to the gym. We might like to cycle for exercise or mountain bike for fun. Bringing along a first aid kit is one of the last things I think about before hopping on my bike. So, I wanted to find a way to piece one together that is always ready to go and I can take from one bike to another easily. Check out below for my water bottle first aid kit, along with some general biking first aid kit tips, and some of the best pre-made kits if you want to buy one ready to go.
What should be in a bike first aid kit?
This is a kit that your average person might take along on their weekend bike ride or daily cycling trip. This isn’t necessarily meant for your weeklong bike-packing trip, or if you are an advanced racing cyclist and putting in hundreds of miles a week. Below are the general items that should be included in a bike first aid kit.
Items for Cleaning
Water – Obviously you will want to bring water along to stay hydrated, but you’ll also want it to rinse out any wounds, especially if they’re filled with sand or dirt from taking a fall. Conveniently, if you ride with a second water bottle, this is a great make-shift way to irrigate a wound.
Antiseptic – There are a number of options out there, but bringing along something that can kill germs or bacteria is a good first step to protecting against infection.
Antibiotic ointment or petroleum jelly – Applying some type of ointment to a dressing is a good way to promote healing and keep the wound from becoming infected.
Tweezers – These are useful for removing debris from a wound or pulling out a splinter, thorn, or stinger.
Bandages
Gauze – Gauze is probably the most versatile dressing you can use. Having different sizes ready to go is ideal, but you can always cut down a larger one.
Tape – You’ll want some sort of tape or method of holding gauze in place, and medical tape is likely your best option.
Blister tape – Chafing and hotspots are a regular occurrence when biking. Carrying along some sort of blister tape is a good way to cover hot spots before they become full-blown blisters.
Band-Aids – Quickly take care of all of your minor cuts and scrapes by having a variety of adhesive bandage sizes on hand.
Personal medications
If you have personal medications or prescriptions it’s probably a good idea to take some along with you, especially items like EpiPens for allergies or an inhaler.
First aid tips to consider before or after your ride
- Anti chafing product – If you’re prone to chafing, do yourself a favor and apply some before your trip. I personally use Body Glide products.
- Sunblock – If you’re on a bike, you’re likely exposed to at least some amount of sun. If you’re cycling, you may not see any shade for the whole trip. Apply some sun block beforehand and bring some along too.
- Don’t forget to replenish your kit after you return from your trip if you’ve used any of the contents.
- Prevention is always better than cure. Wear a helmet and any other protective equipment that is appropriate for the type of bike ride you’re taking.
- Use lights to help drivers to see you. I’ve been really happy with these.
How to DIY a water bottle first aid kit
The best first aid kit is the one you carry. This isn’t a comprehensive first aid kit, but it is convenient and easy to grab and go. You can also adapt it to whatever your needs are.
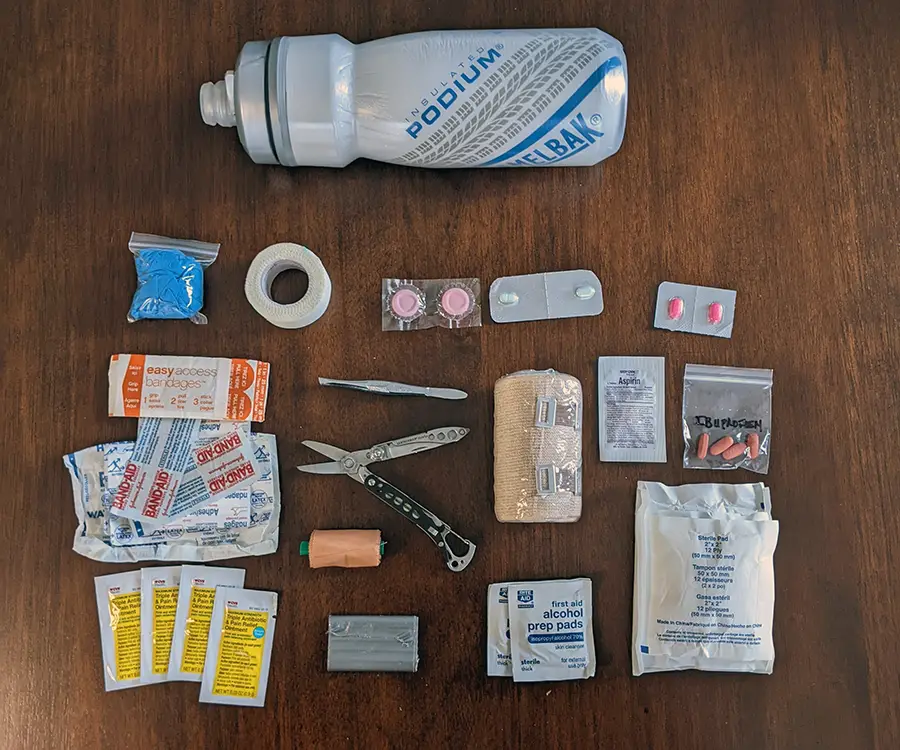
Contents
- 21 oz water bottle
- Nitrile gloves
- Medical tape
- Leukotape, several feet rolled on a straw
- Duct tape, about 3′ rolled on itself
- 3″ elastic bandage
- Assorted adhesive bandages
- 2″x2″ and 3″x3″ gauze pads
- Single use triple antibiotic ointment packets
- Alcohol pads
- Over the counter medication: Ibuprofen, Aspirin, Benadryl, Imodium, and Pepto
- Tweezers
- Mini multi-tool (mostly for the scissors and blade)
How to pack it
I packed my water bottle in three general layers: items that are hard to remove on top, items contained in a ziplock bag in the middle, then loose items that are easy to dump out at the bottom.
First, the medical gloves are on top so I have easy access to my PPE. Then, I made sure the difficult items to grab are within pinching reach. The elastic bandage fit pretty snug, so this was the uppermost item. In the center and at the neck, I grouped items into Ziploc bags so that they are easy to grab and pull out. This consisted of loose items like adhesive bandages, alcohol pads, gauze, etc. At the bottom are items that I can simply get out by turning the bottle upside down. This layer consisted of items like tweezers, multi-tool, and medication that are individually wrapped in a package.
Limitations
There are some obvious limitations with this kit. Your access to the contents is limited given the size and shape of the bottle and how much it narrows at the neck. This makes how you pack it extremely important as well as your choice of the water bottle. Along those same lines, some of your contents might be loose in the bottle, and if they are hard, they’ll rattle around. So, you may want to tape things together or pack them in a way that minimizes the rattling.
Other items to consider for your bike first aid kit
Liquid bandage – I generally like to keep any cuts or wounds open so that I can better treat them when I get home. I’ll usually reclean any wounds and apply a new bandage and dressing. But sometimes you just need to get a cut closed up or stop the bleeding in an area where a Band-Aid will not last. This is where liquid bandage comes in. Just make sure the wound is clean first!
Triangle bandage – I really wanted to get this to fit because I think they are incredibly valuable and multi-purpose. I just couldn’t. Maybe with a different bottle.
Tubular netting – You might consider taking along 6″-8″ of tubular netting to keep dressings and bandages in place.
Related Article: Mountain Bike First Aid Kit: DIY & Best MTB Kits
Best bicycling first aid kits
If you don’t want to put together your own kit, I totally get it. A DIY kit is generally more expensive upfront and takes some time to put together. Below are a few options that I think are a great starting point. The problem I have with premade first aid kits is when you use an item, you won’t already have those items on hand. For example, those single-use tubes of ointment or sunblock are great for their pack size, but if you ever use them, you’ll need to buy a box of replacements anyways. I have more reasons to DIY your own kit. If you’re interested, check out 11 Reasons to DIY your First Aid Kit.

Adventure Medical Kits Adventure First Aid Kit 1.0
This is your budget-friendly first aid kit that has most of what you need and comes from a reputable brand. It’s 6.5″x5″x2″ and about 0.15 lbs. It contains a first aid guide, antiseptic wipes, an assortment of adhesive bandages, medical tape, a 2″ elastic bandage, moleskin, antibiotic ointment, After Bite sting relief, Ibuprofen, Antihistamines, Acetaminophen, Asprin, and even a button compass and whistle. I’d suggest leaving the butterfly bandages and compass at home and squeezing in some duct tape and gloves.

JOAN’S Bike Kits: Bicycle Classic First aid kit. 40 Pieces
This kit will have everything you need to get started: first aid guide, assorted adhesive bandages, various types of gauze, tape, 3″ elastic bandage, triangle bandage, CPR face shield, and more. It actually has more than you might want to take. If you’re just cruising around town, I don’t know that the emergency blanket, bandage scissors, or eye pad are necessary, unless you want to be prepared for a car/bike collision. I also question the quality of some of the contents and would repack the contents into my own bag, but overall, this is a great kit.

CrashPads® Adhesive Bandages for Road Rash, Raspberries, Cuts, Scrapes and Burns
This isn’t an item to bring along on your bike ride, but for aftercare at home. Once you’ve gotten your wound cleaned up, this durable bandage is meant to be kept on for several days afterward, allowing the wound to heal quickly without changing bandages.
What do you carry on you during your bike rides? Let us know in the comments below.